
Upgrading your home with a smart thermostat is one of the easiest and most efficient ways to modernize your home’s heating and cooling systems. These devices offer precise control over your home’s temperature, can be controlled remotely via your smartphone, and can even learn your habits to optimize your home’s climate for energy efficiency. However, installing a smart thermostat is not always as simple as just plugging it in. Proper wiring is essential to ensure that the smart thermostat functions correctly and integrates smoothly with your existing heating and cooling system.
This article will guide you through the process of upgrading your home with smart thermostat wiring, providing you with the information you need to complete the installation safely and effectively.
Understanding Smart Thermostats and Wiring Basics
Before diving into the installation process, it’s important to understand the basics of smart thermostats and the wiring involved. Unlike traditional thermostats that simply connect to a heating or cooling system, smart thermostats have additional features that require a more complex wiring setup. These features often include Wi-Fi connectivity, sensors for motion and temperature, and integration with home automation systems.
Typically, a smart thermostat requires four key wires:
- C-Wire (Common Wire) – This wire provides continuous power to the thermostat, which is essential for running the smart features.
- R-Wire (Power Supply) – This wire delivers power from the furnace or HVAC system to the thermostat.
- Y-Wire (Cooling Wire) – This wire controls the air conditioning unit.
- W-Wire (Heating Wire) – This wire controls the heating system.
However, some older homes may not have a C-wire, which can complicate the installation. In these cases, an adapter may be required, or an electrician may need to run a new wire.
Step-by-Step Guide to Installing Your Smart Thermostat
Step 1: Turn Off the Power
The first step in any electrical project is to ensure safety. Before you begin removing your old thermostat, turn off the power to your HVAC system at the breaker panel. This is crucial to avoid any accidental electric shocks or damage to the system. Depending on the model, smart thermostats may require a constant flow of electricity, so cutting off the power to the system will help prevent any issues while working on the wiring.
You can locate the breaker for your heating or cooling system by checking your home’s breaker panel. Once you’ve identified the right breaker, turn it off to ensure that the system is de-energized before proceeding.
Step 2: Remove the Old Thermostat
Once the power is turned off, the next step is to remove the old thermostat. Start by unscrewing the thermostat from the wall. You may need to use a screwdriver to remove any mounting screws holding the device in place. After removing the screws, gently pull the thermostat away from the wall, revealing the wires attached to the back.
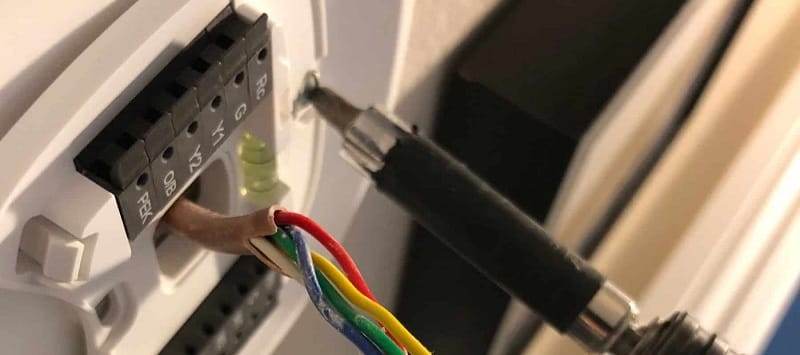
Take note of the existing wiring configuration before disconnecting anything. It’s a good idea to label each wire according to its corresponding terminal on the old thermostat (you may find labels like “R,” “C,” “W,” or “Y” on the wiring). This will help you match the wires correctly when connecting your new smart thermostat.
Step 3: Install the New Thermostat Mounting Plate
Next, install the mounting plate for the new smart thermostat. Most smart thermostats come with a template or guide to help you align the plate properly. Make sure the plate is level and securely attached to the wall. Use screws to mount it in place, ensuring that the device is stable and won’t shift over time.
In some cases, you may need to drill small holes into the wall to secure the mounting plate, especially if the new thermostat is slightly different in size or shape from the old one.
Step 4: Wiring the Smart Thermostat
Now comes the most critical part—connecting the wires to your new smart thermostat. First, ensure that the wires from your HVAC system are properly labeled. If you have a C-wire available, this will provide the power required for the smart thermostat to operate its Wi-Fi and other features. If you don’t have a C-wire, you can use a C-wire adapter, which is commonly included with smart thermostats, or you may need to have an electrician run a new wire to your thermostat location.
Start by connecting the wires to the corresponding terminals on the thermostat. The labels on the thermostat should match those on your existing wiring (e.g., R to R, W to W, Y to Y). The C-wire will usually connect to the C terminal on the thermostat.
If your thermostat does not have a C-wire terminal, you may need to consider using the power-stealing method, which allows the system to pull power from the heating and cooling circuits when needed. Some models are designed to function without a dedicated C-wire, but this may reduce the thermostat’s ability to run efficiently or impact its features.
Once all the wires are connected, carefully secure them in place by tightening the screws on the terminals. Ensure that each wire is securely fastened and that no copper wire is exposed, which could lead to short circuits or electrical issues.
Step 5: Install the Thermostat
With the wiring in place, you can now attach the smart thermostat to the mounting plate. Most smart thermostats simply snap into place, but be sure to follow the manufacturer’s instructions for your specific model. Once installed, double-check the connections to ensure everything is properly secured.
Step 6: Turn the Power Back On
After the thermostat is installed, it’s time to restore power to the system. Return to your breaker panel and flip the breaker for the HVAC system back on. Your thermostat should power up and display a setup screen. If you have a Wi-Fi connection available, you may be prompted to connect the thermostat to your network so you can control it remotely via an app.
Step 7: Test the System
Once the thermostat is powered up and connected, test the system to ensure everything is working properly. Set the thermostat to the desired temperature and check if the heating or cooling system responds as expected. Monitor the system for a few minutes to confirm that it’s functioning correctly and that the smart thermostat is controlling the temperature accurately.
Final Thoughts on Smart Thermostat Wiring
Installing a smart thermostat can significantly enhance your home’s energy efficiency and comfort. It’s a relatively straightforward DIY project for homeowners with basic electrical knowledge, but it does require careful attention to detail and safety. If you’re uncomfortable with handling electrical wiring or don’t have the necessary skills, it’s always a good idea to consult a professional.
When upgrading your home with a smart thermostat, ensure that you are working with the correct wiring configuration and that the system is safely installed. While resetting circuit breakers or wiring connections may seem simple, proper installation is crucial for both safety and optimal performance. Always make sure the power is off before working with electrical components, and don’t hesitate to seek professional help if necessary. With the right setup, you’ll enjoy the convenience and efficiency of a modern smart thermostat for years to come.

Why “Standard Size” Windows Don’t Exist? Window Replacement Experts in Athens, AL Get the Perfect Fit
When it comes to home renovations, windows play a pivotal role in both aesthetics and functionality. Many homeowners in Athens, AL, might assume that window sizes are standardized, but this is a common misconception. In reality, the concept of “standard” window sizes is more myth…

Why do regular AC tune-ups extend the life of your cooling system?
Air conditioning systems are substantial investments, typically costing thousands of dollars to replace. Without regular maintenance, these systems deteriorate faster than necessary. Depending on the manufacturer, neglected HVAC systems can lose up to 5% of their efficiency yearly without proper maintenance. This decline happens gradually,…